Installation of Nexgen Print Utility Lite
Download Nexgen Print Utility V11 *** Latest Version ***Step 1: Double click on the setup.exe to start installation. The Nexgen Print Utility can be
installed on Windows XP, Vista, Windows 7 and Windows Servers.

Step 2: Click on I Accept to accept the terms of License agreement.
Step 3: Select User Name and Organization and click on Next.

Step 4: On current settings box, click on Install.
Step 5: On the next step check the checkbox next to the launch the program and select Finish. With this step setup installation is finished.
Step 6: User will get Nexgen Print Utility Lite option in start menu. User can also pin this icon to taskbar with right click on icon and select the option Pin to Taskbar.
Login to Nexgen Print Utility Lite
Step 1: Double click on Nexgen Print Utility Lite to start the application. It will show login pop up.
Step 2: Select username of that user for which user wants to check print log. Select password of that user. Need to select proper Instance. Select the checkbox next to Remember Me, so that login credentials will get saved for future login. Click on Login.
Step 3: Once user click on login with valid credentials, it will show connecting server for a while and login to the application.
User Interface of Nexgen Print Utility Lite
Step 1:
Defining columns for the given table.
* User can apply sorting to all the columns to sort the given records.
●
Print Doc : Click on Print Doc, it will show option to print
JOB Description.
●
JobID : This Column shows JOBID of the print log
●
Print File: System will
display the PRN or PDF path for the Print File column
●
Last Update :Shows when the
record is updated to row
●
Downloaded on: Shows when that
PRN is downloaded
●
Printer : This Column
shows assign printer
●
Base Material : System will
display the Basematerial Name of the Print log
●
Variable Size: Shows variable
size of the Print Log
●
Status: Displayed the
status of the Print Log
like: Ready To Print, Reprint, Printed, Downloaded etc.
●
Production : It displays the Production Method for the
JOB ID like: Laser or Thermal.
●
Size : Shows size of the
print log file
Step 2:
Status: Click on required status, then click on search. User will get only those records, for which filter is applied in status column of the table.
Step 3:
Printer: Click on Printer, then click on search. User will get only those records, for which filter is applied in Printer column of the table.
Step 4:
Date: Date field is given to select from calendar, in order to select date wise record. Click on date filed. Pick up a required date. Table will show the date wise records.
Step 5:
Only sample Job: If user select a checkbox next to sample job id and click on search , user will get only sample job id in table
*Please make a note that user can also user combination of all the given options , if user wants to select particular record with Date, Printer, Status or Sample Job
Step 6:
Print : Select a record from the table and click on Print, job will be submitted to printer. User can Print one JOB at a time.
*Selected row will get highLiteed in blue colour.
Delete: Select rows, which needs to be deleted. Click on delete. User can delete multiple rows.
Manual for Nexgen Print Utility Lite
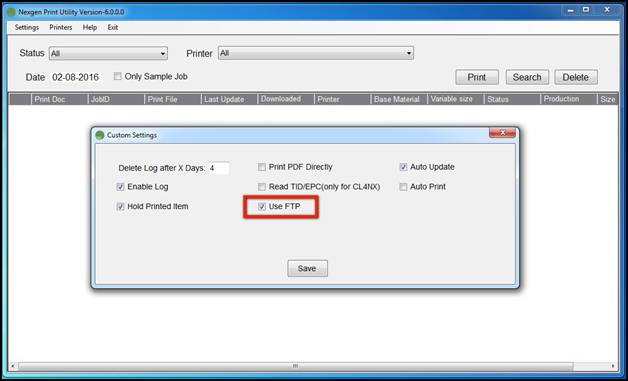
Step 1: Settings
Click on Settings. Select Service Settings. Custom setting popup will appear.

Delete Log after X Days: Select number of days after which user wants to delete the log record. After X Days log will get deleted.
Print PDF Directly:
PDF file will be directly send to printer for printing and status of the file will get changed to “Printed”
Auto Update: By selecting the “Auto Update” check-box the application will be automatically updated to a new introduced version without manually installing it time and again.
Enable Log: If Enable log is un-checked, record of the printed log will not be shown in table.
Auto Print: By default it is checked. If it is checked then system will allow to user for automatic print by Nexgen Print Utility.
Hold Printed Item: By default it is unchecked. Check the checkbox to view the details of order item in Print Queue window to print later. If it is unchecked, order items will not be display in print queue window after printing.
Note: If both the check-box(s) of “Auto Print” and “Hold Printed Item” are unchecked, Order items can be view in “Print Queue window” to print later.
USE FTP: This option is to download files using FTP..
Step 2: Printers
●
Click on Printers.
●
Select My Printers, one windows will pop up.
●
List of shared printers (with the user) is displayed under PrinterName.
●
MachineName will show users
Computer Name.
●
Click on Update printer list, it will update the list of Printers, so
that newly added will be displayed.
Step 3: Help
●
Click on Help
●
Select About, it will route user to informational page of Nexgen, named as “Who we are”
●
Click on a help
●
Select Submit Log, one pop up will appear, “Log Submitted
Successfully”
●
This selection will submit Print Log to the admin

●
Click on Help
●
Click on Contact Us
●
This will route user to Contact Us page of Nexgen.

Step 4: Exit
●
Click on Exit
●
It will displayed a pop up for closing the application
●
Click on “Yes” to close the
application or Click on “No” to
cancel the exit option.
To upgrade Nexgen Print Utility:
Step 1: System will check the Latest Print Utility Version during login if upgrade version available then on user confirmation it will upgrade the application into latest one.